This document is designed to help you use the Revolution Fermentation hard cider kit.
The hard cider brewing kit’s volume (3.8L) is perfect to get started, experiment, or make your own hard cider as often as desired. With experience and reading, you will learn to create all kinds of hard ciders. You will be able to control the residual sugar content, the level of fizz, the alcohol content, the choice of ingredients, etc.
But until then, this handbook will get you started quickly and easily.
The handbook is divided into two parts:
- Hard cider recipe that provides the essentials to get you started.
- How to improve your technique to go a step further. It is optional reading, but it will be useful if you have any questions.
Kit Contents
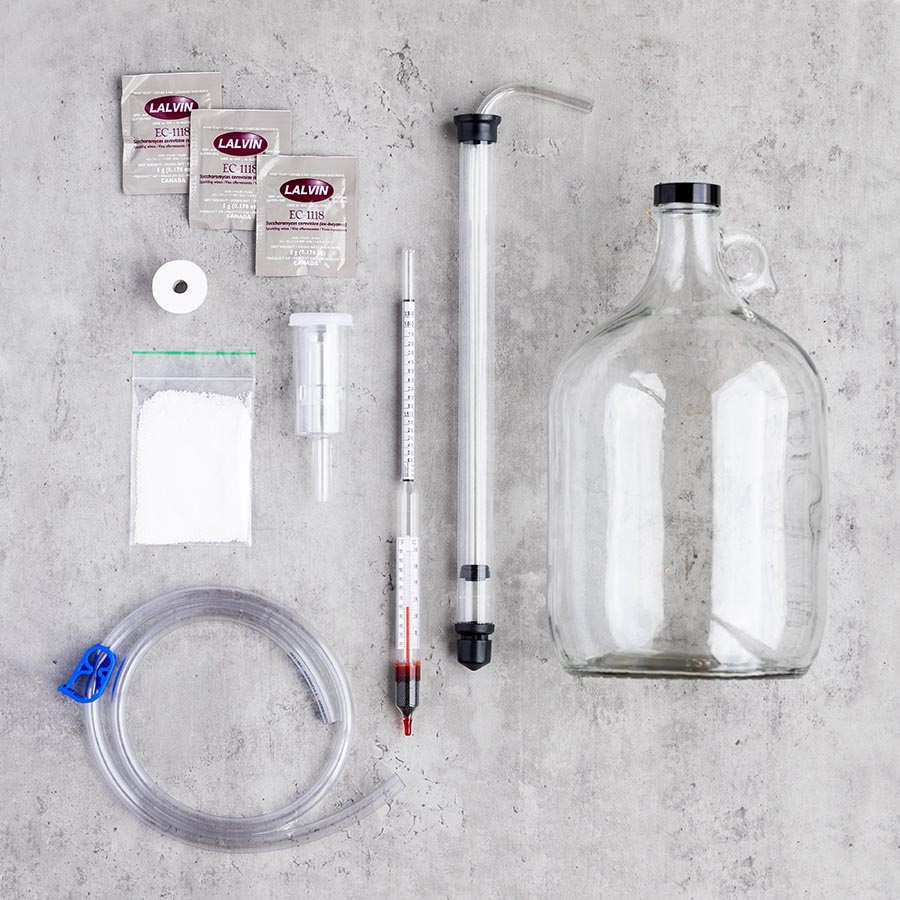
Your hard cider brewing kit includes:
- 1 gallon (3.8L) glass carboy
- Lid
- 3 piece airlock
- Perforated lid
- Small clamp
- Hydrometer
- Small auto siphon
- 3 sachets of EC-1118 yeast
- Oxy-San No-Rinse Sanitizer (100g)
- 3 ft. tube (90cm)
- Instructions (this document)
You will also need (not included):
- 3.5 litres (1 gallon) of apple juice
- Sugar, or honey for bottling
- Funnel
- Pressure resistant bottles (if needed, read how to choose your bottles)
Hard Cider Recipe
Here you will find the essential information to make your own hard cider quickly and easily!
How to Find Apple Juice?
Finding preservative free juice (without potassium sorbate or sodium benzoate). Head to your local farmers’ market or natural grocery store.
Take the juice out of the fridge and let it warm up to room temperature before you start making your hard cider.
Read the rest of the instructions (at least until the fermentation chapter) so you know what to expect. And have fun!
Sanitize
The equipment must be clean to maximize the success of your fermentation.
No stress. Your working environment does not have to be sterile like a laboratory! Your goal is to have a clean working environment and very clean equipment.
So, when you get ready for brewing day, move any items that might be in the way and clean your counter, then follow the procedure outlined below.
How to Sanitize Your Equipment?
- Add 1 tbsp. (15g) of Oxy-San sanitizer to the carboy.
- Fill the carboy to the brim with cold water.
- Let it stand for at least 2 minutes.
- During this time, clean your sink, then place the sink stopper.
- Pour the contents of the carboy into the sink.
- Soak the equipment you are about to use (carboy, lid, perforated lid, tube, funnel, and optionally the densimeter).
- Allow soaking for at least 2 minutes.
- Remove the sink stopper and let the equipment drain without rinsing.
Oxy-San sanitizer is non-rinse, tasteless, odourless, ecological, non-toxic, and biodegradable. It is 3 times more powerful than sulphite, but contains no sulphites, soaps, or phosphates. Warning: Oxy-San sanitizer is corrosive to the skin and eyes!
Starting Fermentation
- Pour the contents of the yeast sachet into a glass of lukewarm water.
- Wait 15 minutes for the yeast to activate.
- Place the funnel on the carboy.
- Pour the activated yeast into the carboy.
- Pour in all the juice.
- Temporarily install the screw lid on the carboy.
- Shake thoroughly to oxygenate and promote yeast growth.
Fermentation
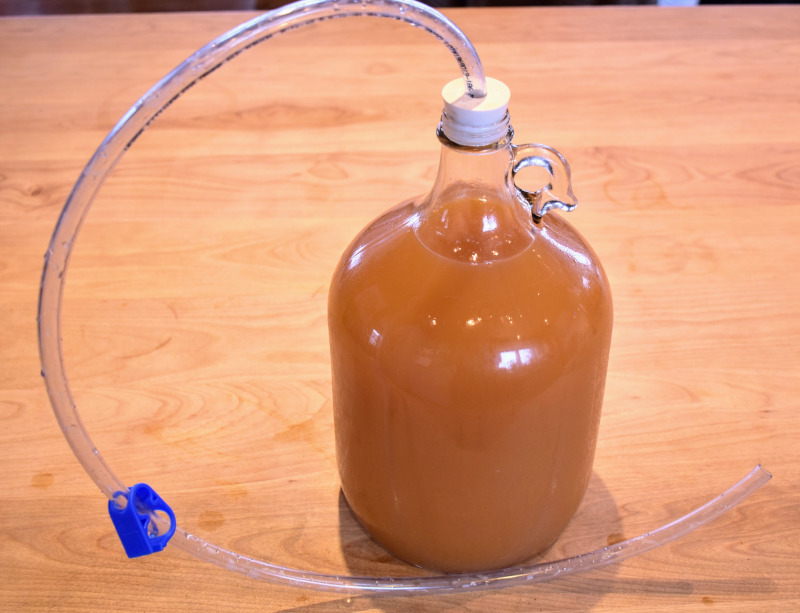
- Insert the flexible tube into the rubber lid.
- Install the lid on the carboy.
- Add ½ tsp. of sanitizer into a large glass of water.
- Place the end of the tube into the glass. This allows the CO₂ to escape without risk of contamination.
- During the first few days, the bubbles are very vigorous, and foam may come out of the tube. This is normal.
- As soon as the fermentation has settled down a bit (after 4 or 5 days), remove the tube and install the airlock instead.
- Fill the airlock with water up to the line.
- Install the airlock on the perforated lid.
- Let the hard cider ferment at room temperature for at least two weeks without disturbing it, except to show it to your friends.
Bottling
When to Bottle?
You can bottle when the hard cider is no longer cloudy, or the airlock is making less than one bubble per minute.
If you bottle too soon, there will be too much residual sugar and your hard cider will be too fizzy.
You can also leave your hard cider in the carboy for months. If you decide to let it ferment for more than a month, you will just have to monitor the water level in the airlock from time to time. Due to natural evaporation, you may need to add water to the airlock.
How to Bottle Hard Cider?
Sanitize equipment
- Rinse bottles thoroughly with water.
- Clean your sink, then then place the sink stopper.
- Put 1 tbsp. (15g) of Oxy-San sanitizer in the sink.
- Fill the sink with 4L of cold water.
- Soak the bottles, tube, and auto siphon.
- Allow it to work for at least 2 minutes.
- Remove the sink stopper and let the equipment drain without rinsing.
Assembling the Auto Siphon
When you first use the auto siphon:
- Insert the rigid pipe of the auto siphon into one end of the flexible pipe. Beforehand, soften the end of the hose by soaking it in very hot water.
- Ensure that the black end cap is fitted correctly, to prevent the transfer of deposits.
Filling the Bottles
- Put 1 teaspoon of sugar or honey in each bottle. This sugar is used to activate yeast, so that they produce a good amount of CO₂ (carbonation). This amount of sugar is for 750ml bottles. For smaller bottles, add less sugar.
- Remove the airlock lid from the carboy.
- Gently place the racking cane in the carboy. Stop just above the sediment (yeast) layer.
- Put the end of the tube in a bottle placed below the carboy (so that the siphon effect occurs).
- Make one single back-and-forth movement to engage the auto siphon.
- The suction will force the hard cider up and through the racking cane.
- Fill the first bottle this way.
- When the bottle is full, stop the flow with the pliers. Move on to the next bottle.
- Tilt the jug when the hard cider level gets low but be careful not to suck up any sediment (or at least not too much).
- Close the bottles.
- Store the hard cider at room temperature for a fortnight without disturbing it.
- Two weeks later: Enjoy!
Put the bottles of hard cider in the fridge the day before drinking.
Enjoy your hard cider!
How to Perfect Your Technique?
This section is optional, but it will help you go further in the making of hard cider!
Which Bottles to Use?
We recommend 750ml, clear, pressure resistant glass bottles, as they are very versatile and durable.
If you are making still cider, then the bottles do not need to be pressure resistant. It is possible to buy, or recycle, beer or wine bottles. You just need to provide the bottling equipment and lids.
We do not recommend plastic bottles.
How to Measure Alcohol Content?
The alcohol content is calculated with a hydrometer by measuring the amount of sugar that has been transformed by the yeast. The density of the liquid can be determined by observing the depth at which the hydrometer descends.
Since the alcohol has a different density than the sugar/water mixture you started with, you can calculate the percentage of alcohol by comparing the initial and final density.
Measuring the Density
To estimate the alcohol content, the density should be measured before fermentation (apple juice) and when bottling (hard cider).
Ideally, use a test tube filled with juice to use the hydrometer. If you do not have one, place the hydrometer directly in the carboy, or in any other sufficiently deep and narrow container.
When bottling, you will not be able to place the hydrometer in the carboy, as it may sink too deep.
Steps for measuring the density of a liquid
- Sanitize the hydrometer and any equipment you are going to use.
- Install the hydrometer in the liquid.
- Rotate the hydrometer to release any bubbles that have formed on its surface.
- Make sure the hydrometer floats freely and does not touch the sides.
- At eye level, read the measurement from the bottom of the meniscus. The meniscus is the curved surface caused by the surface tension of the liquid.
- Record your reading and the date of measurement.
- If the equipment has been properly handled and disinfected, return the sample to the carboy.
Calculating the Alcohol Content
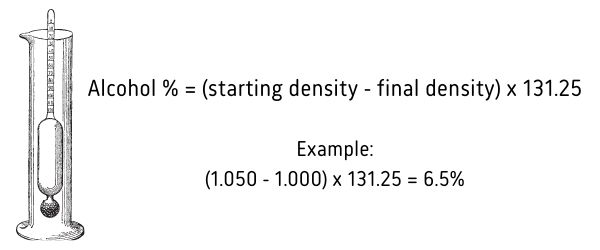
From the initial density (of the juice) and the final density (of the cider), you can calculate alcohol content with the following formula: Alcohol (%) = (Initial Density – Final Density) x 131.25
So, if your initial density was 1,050 and your final density 1,000, your cider contains about 6.5% alcohol.
How to Control Alcohol Content?
Alcohol content can be anticipated and controlled by adjusting the sugar content and selecting the type of yeast.
Yeast converts sugar into CO2 and alcohol. If fermentation is complete, then most of the sugar will be converted into alcohol.
However, there are two limiting factors:
- If the sugar level is too high, yeast will not be able to ferment (for example, if honey is not diluted, it cannot ferment).
- If the alcohol level becomes too high for the type of yeast, then they will cease to ferment and leave residual sugar.
Many specific cases that are beyond the scope of this guide. However, here is an example that should help you get started.
Example for a 12% alcohol cider
Once you determine the quantity of alcohol you want to obtain, you can determine the initial density you need to have in your liquid:
Alcohol content / 131.25 = density of sugar that will need to be processed
By using the calculation figure for alcohol by density (131.25), it is possible to determine the amount of sugar that needs to be processed:
12 / 131,25 = 0,091
If all the sugar is fermented, then the final density should be about 1,000. Therefore, the initial density should be around 1.091.
To reach this density, gradually add sugar to the juice, dissolve well and measure after each addition until the right density is reached.
Which Yeast to Use?
The champagne yeast included in the kit is an excellent starter yeast. It is very versatile, easy to use, and theoretically allows you to reach an alcohol level of 18%.
However, you might like to choose another yeast (Lalvin D47, Lalvin K1-V1116…) for more fruit flavours, to control residual sugar, or for any other reason.
You could also choose not to add yeast and rely on wild yeast naturally present in unpasteurized apple juice! This method provides greater simplicity, but a higher failure rate.
What Sanitizer Should I Use?
Oxy-San and Star-San are excellent sanitizers. For more information, see our article How to clean and sanitize your fermentation equipment.
How to Get a Sweet Cider?
Do you prefer a sweeter cider?
There are 3 techniques to keep residual sugar at the time of bottling:
- Reaching the alcohol tolerance threshold of the yeast.
- Killing yeast over time (after months of fermentation).
- Killing yeast by adding sulphites.
There is no one perfect solution for all. The most natural and fastest solution is solution #1.
Example:
- Use D47 yeast which cannot exceed the theoretical 14% alcohol mark.
- Adjust the amount of sugar to have an alcohol potential of 14% or higher (see How to control the alcohol content). The yeast will most likely stop fermenting before 14% alcohol.
- Let it ferment long enough (in full).
- Add sugar when bottling if necessary.
And there you go!
How to Have a Cider Without Sediment?
The sediment at the bottom of the carboy is dead or dormant yeast. As sediment has a particular taste, it is preferable to remove it to obtain a pure cider.
To limit sediment in the bottles:
- Place the carboy in the fridge for 24 hours to clarify the liquid (cold crashing method).
- Transfer the liquid with the auto siphon into the bottles, avoiding transferring the sediment from the bottom.
If you want to limit the amount of sediment as much as possible, it is recommended to do several rackings before bottling.
- When the cider is ready to be bottled, place the carboy in the fridge for 24 hours to clarify (cold crashing method).
- Transfer the cider to a new carboy using the auto siphon.
- Let it ferment for a few more days.
- Make a new cold crash.
- Transfer the cider to the bottles.
How to Find Out More About Homemade Cider
Making your own cider is very easy! Get started!
We encourage you to do your first recipe without worrying about it, simply by following the first part of this guide.
Likely, the whole process isn’t totally clear to you. Don’t worry. It will work just fine, even if you don’t have to take out your calculator.
Afterwards, try out some new recipes. Simply, step by step, you will get better at it and find the method and ingredients that work best for you.
- Buy pressure resistant bottles
- Buy a new carboy to start several fermentations at the same time
- Buy alcohol fermentation equipment
- Buy a stainless steel funnel
Other recipes you can try with the Cider Making Kit:
