Homemade Koji Recipe
Koji is used to make miso, soy sauce, amazake and many other fermentations. This Japanese ingredient is currently all the rage with chefs, adding a touch of umami and complex flavours to recipes!
Equipment
- 80% alcohol or disinfectant
- Food steamer or steamer basket
- Small fine sieve
- Thermometer
- Incubator
- Large glass or stainless steel dish
- Plastic wrap (optional)
Ingredients
- 500 g white rice
- 1 g koji culture
- 20 g flour (white, rice, corn starch)
Steps
Preparing and Cooking the Rice
- Rinse the rice in cold running water until it becomes clear.
- Cover the rice with water and let it soak for 12 hours at room temperature. Drain.
- Put about 5cm of water in the bottom of a cauldron. Put a steamer basket with holes on top.
- Place a cloth or several layers of cheesecloth in the bottom of the steamer basket.
- Pour the rice onto the cloth and spread it out flat to cover the bottom of the steamer basket. Fold the cloth over to wrap the rice. Close the lid of the cauldron.
- Bring the water to a boil on medium heat and steam the rice. Check from time to time that there is still water in the pot during cooking. Cook the rice for 1 hour, or until it loses its opacity, is shiny, and has a rubbery texture. If the whole grain is a little translucent, it is cooked!
- Wash your hands well. Disinfect the equipment and your work surface. Allow it to dry.
- Place the rice in a clean bowl, making sure to crumble any lumps with your hands. Let it cool to 35°C (95°F), stirring regularly by hand to help it chill. This traditional technique helps limit the moisture in the rice.
(Alternative Cooking Method:)
- Rinse and soak as directed. Cook the rice in boiling water until al dente, i.e. still firm to the bite. Drain the rice and spread it out on a cloth, then let the steam evaporate.
- The rice grains should be flaky and dry to the touch. They should separate easily from each other.
Inoculation of Rice
- Gently place the koji spores in a small bowl. Be careful! The spores are light and can easily float away.
- Gently add the flour on top. Mix without lifting the spores.
- Sieve the flour-spore mixture over the entire surface of the rice and mix well (always using your hands, as tradition demands) to distribute the spores evenly.
- Line the bottom of an airtight container with a clean cotton cloth and spread the rice over it.
- Cover with another cloth and put the lid on, but don't close it airtight.
- Alternatively, spread the inoculated rice in a large glass dish and cover it with plastic wrap. Poke a few holes at the edges with a knife to ensure air circulation.
Incubation of Koji
- Place the container in the incubator at a temperature between 27 and 35°C (80 and 95°F).
- Check the temperature, ideally with a digital thermometer inserted directly into the rice (to measure the temperature of the rice and not the air in the incubator). Adjust the temperature if necessary.
- Every 8 to 12 hours, take the rice out. Check that the grains are not dry (hardened) or wet (shiny) and that they still have a rubbery texture. Mix the grains well with your (clean) hands, taking care to crumble any lumps. If the grains are too dry and have hardened, spray a little water and mix well. If necessary, wipe off any condensation.
- After 12 to 16 hours in the incubator, there should be a slightly sweet smell and specks of white foam starting to form on the rice grains.
- After 30 to 36 hours in the incubator, the grains should be covered with a fine white film and should smell like something between mozzarella and vanilla, with a hint of dirty socks!
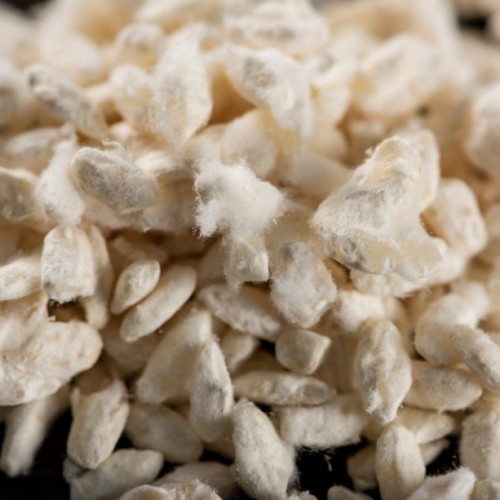
- After 36 to 48 hours in the incubator, the rice will almost be completely covered with white threads.
- When the slightest green or yellowish tinge appears on a few grains, the koji is ready. This means that it is starting to produce spores.
- Spread the koji in a thin layer in an airtight container and refrigerate. Koji produces heat as it ferments, so it should be spread into a layer less than 3 cm (1⅛ in.) thick to ensure that fermentation is quickly and evenly stopped.
Notes
Congratulations! You've made your own koji!
Have you tried it?Share and tag @revolutionfermentation!