Making homemade hard cider is easier than you think!
This complete guide is designed to help you make your first homemade hard cider recipe and to serve as a reference for the next ones!
All you need for making homemade hard cider are three ingredients: apple juice, yeast, and a little patience!
We explore the choice of equipment and ingredients in detail, then guide you step by step through the process of making your own hard cider from apple juice.
There are a thousand and one ways of making homemade hard apple cider, and just as many enthusiasts for each method. Some love it dry, others fizzy. For some, the only ingredient is apple juice and patience, while others prefer more refined recipes with various ingredients and accurate control of fermentation. There is no perfect method for all; each technique can produce apple cider of the highest quality.
We can’t cover everything in depth in this guide, otherwise, you’d be holding a book in your hands, like the excellent The Big Book of Cidermaking. We will, however, give you a solid basis for making sulphite-free hard cider easily and for understanding how to personalize the recipe in a variety of ways.
Go straight to the step that interests you to learn how to make apple hard cider:
Ingredients for Making Hard Cider
Essential ingredients
Apple Juice
You need apple juice without preservatives, so no potassium sorbate or sodium benzoate (citric acid is ok). Head to your grocery store and look for it in the organic section. “Tradition” brand organic apple juice gives good results, but nothing beats fresh juice from the orchard or even juice you’ve squeezed yourself.
If you’ve got apples and a juicer handy, you’ll need 10 kilos of apples to make about 4 litres of juice, the perfect volume for a 1-gallon carboy.
Yeast
Yeast plays a central role in transforming apple juice into hard cider. It is responsible for converting sugars into alcohol and carbon dioxide.
There are three essential yeast strains for homemade hard apple cider:
- EC-1118: This yeast is renowned for its efficient fermentation and is particularly suited to making pearl or sparkling cider. It is also known to deliver a clean, neutral flavour profile. It also has the advantage of needing few nutrients, as well as being fully capable of producing a non-sparkling cider.
- D47: This yeast is known for producing a rich, flavoured cider with a velvety texture. It accentuates fruity aromas and is often used to make more complex and flavoursome ciders. It has a lower alcohol tolerance, which allows it to produce full-bodied ciders, without sulphites, while remaining within an alcohol content similar to wine.
- K1-V1116: Robust and versatile, this yeast can create hard ciders with intense fruity flavours. It is also fairly tolerant of different conditions, making it practical for a variety of recipes.


Tip: Keep an eye on the expiry date of the yeast and make sure it is stored in the fridge before use. This ensures that the yeast is still active.
Good to know: some homemade hard cider makers like to use the wild yeast naturally present on apple skins. This is called spontaneous fermentation. This can be risky, as you have less control over the end result, but it can also create unique hard ciders with very distinctive flavours.
| Characteristics | Wild yeast | Lalvin D47 | Lalvin K1-V1116 | Lalvin EC-1118 |
|---|---|---|---|---|
| Fermentation temperature (°C) | Variable (generally 15-25) | 15-20 | 10-35 | 10-30 |
| Maximum alcohol content | Around 5% | 14% | 16-18% | 18% |
| Nutrient requirements | Variable | Medium | Low to Medium | Low |
| Aromatic profile | Variable, unpredictable | Enhances fruity aromas | Neutral character | Neutral, clean |
| Common use | Traditional hard cider | White wines, mead, hard ciders | Fruit, hard ciders, white wines | Champagne, hard ciders, wines |
| Control | Low | Medium to High | High | High |
| Risk of contamination | High | Low | Low | Low |
| Result consistency | Low | High | High | High |
| Cost | Free | Low | Low | Low |
Caption:
- Max alcohol content is the maximum concentration of alcohol the yeast can produce before it stops fermenting. It is an indicator of the maximum alcohol content your cider could have.
- Nutrient requirement is the amount of nutrients a yeast strain needs to ferment effectively. Some yeast requires more nutrients to function well, while others are more tolerant of less nutritious conditions.
Experiment with them to find your favourite flavour profile!
Optional Ingredients
Sugar
Apple juice usually contains enough sugar to produce a hard cider containing 4 to 6% alcohol. If you want a cider with a higher alcohol content, you can add sugar, honey, or maple syrup at the beginning of the fermentation process. Don’t add too much sugar, however, as this can unbalance the flavours and affect the cider fermentation process. It’s generally best to err on the side of caution and add little sugar at the start, as you can always adjust the flavour later by adding more sugar or other sweeteners after fermentation if desired. Sugar can also be added during bottling, to create a sparkling hard cider. To monitor and control sugar levels, the use of a hydrometer is highly recommended.

Triple scale hydrometer (alcohol)
$18.50
Determine the alcohol content of your fermented beverage and track its evolution with this triple scale alcohol hydrometer (ABV tester)!
Shop nowYeast Nutrients
Apple juice does not always contain the full range of nutrients needed for yeast to flourish. While some yeast, such as EC-1118, can do relatively well without additional nutrients, others would benefit greatly from a little extra help!
To make up for this deficiency, you can opt for a yeast nutrient specially designed for homemade alcohol production. This supplement, rich in minerals and amino acids, encourages vigorous fermentation and can improve the quality and clarity of your cider.

Sulphites
Sulphites, such as potassium metabisulfite, are commonly used to preserve the freshness of hard cider and prevent the growth of undesirable microorganisms. However, they are not essential, and some people may be sensitive and allergic to them. This guide focuses on making sulphite-free hard cider. If you choose to go this route, it is important to maintain excellent hygiene throughout the process to ensure the quality of your hard cider (discussed later).
Other Ingredients
To flavour your hard cider, you can add fruit such as pears or berries, spices such as cinnamon, aromatic herbs for a touch of freshness, or even oak chips for a woody character. Purists beware, it’s your hard cider!
Hard Cider Making Equipment
All you need to make hard cider is some basic equipment. Nevertheless, choosing the right equipment is essential to ensure the quality and flavour of your cider. If you want to get started quickly, you can buy our hard cider-making kit! For full details of the equipment required, read on.
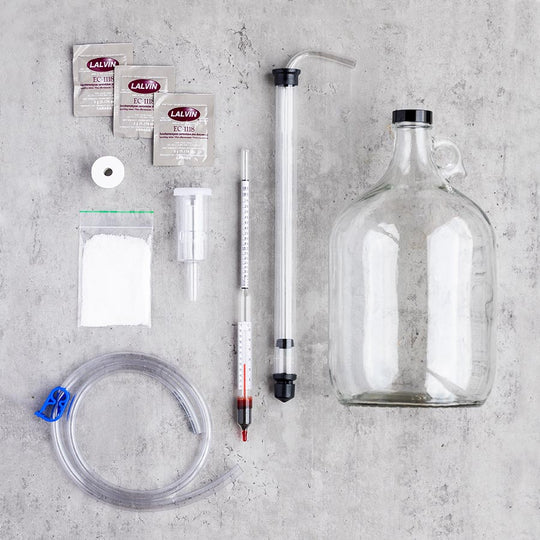
Hard Cider Making Kit
$69.90
The hard cider making kit contains everything you need to easily brew your own hard cider.
Shop nowCarboy
A carboy, also known as a fermenter, Lady Jeanne, or Demijohn, is a container with a narrow neck that limits the liquid’s contact with the air. It can be made of glass or plastic. This shape minimizes oxidation, which is crucial to the quality of the hard cider. Our recipe uses a 1-gallon glass carboy.
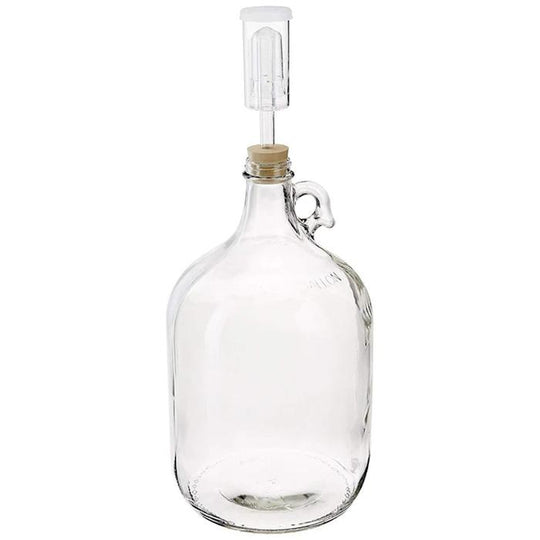
1 Gallon Glass Carboy Fermenter
$25.00
This glass carboy with an airlock is perfect for fermenting wine, beer, mead, cider, and other types of alcohol.
Shop nowAirlock
The airlock is an instrument that allows the CO₂ created during fermentation to escape from the carboy while preventing oxygen from entering.
There are two types: 3-piece and S-shaped airlocks. We prefer the 3-piece airlocks, which are easier to clean.
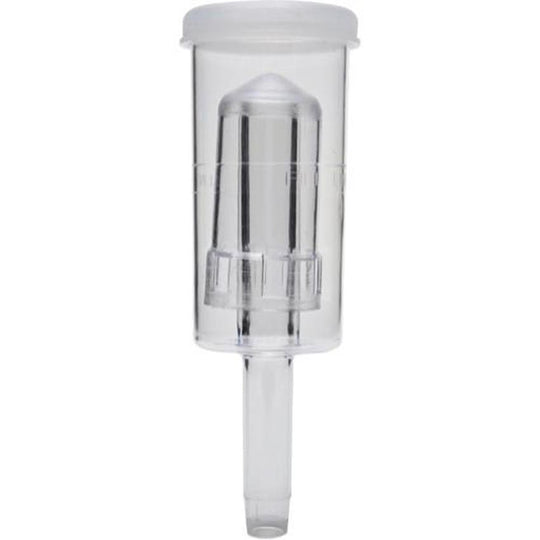
3-Piece Airlock
$2.00
This 3-piece airlock is the best choice for fermentations requiring an oxygen-free (anaerobic) environment, such as beer, wine, mead, sauerkraut and cider.
Shop nowSanitizer
Sanitizing is an essential step in ensuring the success of your hard cider recipe. Preparing alcohol requires a clean, contaminant-free environment. So, every piece of equipment that comes into contact with your hard cider needs to be sanitized.
Sanitizing is not complicated! Simply soak the instruments for a few minutes in a mixture of water and sanitizer.
We suggest no-rinse sanitizers such as Oxy-San or Star San.
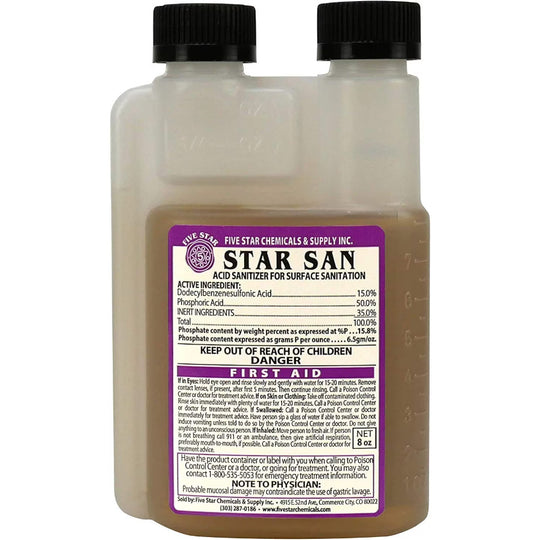
Star San Sanitizer
$24.75
Star San is an easy-to-use, effective, no-rinse, acid-based foaming sanitizer.
Shop nowBottles
The best bottles for your hard cider are pressure resistant glass bottles. These bottles ensure that your hard cider remains sparkling and fresh. You can use lever stoppers or a capper. We recommend glass bottles with “swing-top” stoppers.

750ml Swing Top Glass Bottles (Case of 12)
$49.90 $58.90
Effortlessly store and carbonate your fermented beverages with these foolproof swing-top glass bottles!
Shop nowOptional Equipment
- A hydrometer: This is used to calculate the density and alcohol content by measuring the sugar content. This helps you monitor the progress of fermentation.
- A funnel: to make filling easier.
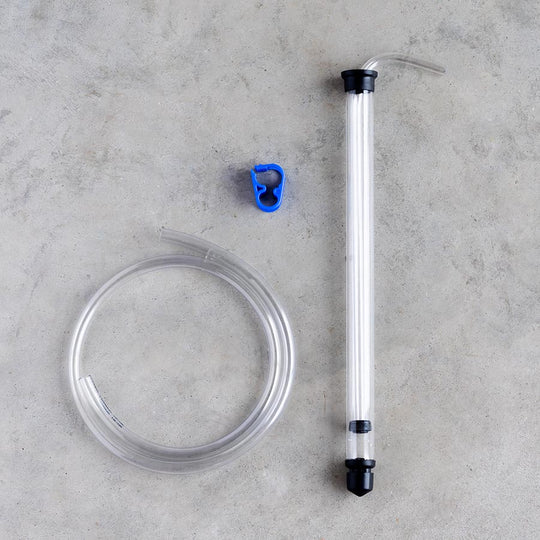
- An auto siphon and tube: useful to facilitate bottling the hard cider and avoid any spillage.
- Brewer’s wash: to clean bottles and other equipment easily and effectively.
- Bottle brush: can be used as a complement or alternative to brewer’s wash.
- Apple press: If you’re using fresh apples, a press is essential to extract the juice.

With this equipment, you’re ready to start making your own hard cider!

Hard Cider Making Process
1. Sanitizing
The secret to successful cider-making lies in meticulous sanitation of your equipment! This prevents contamination that can alter the flavour of the hard cider.
Simply fill a clean sink with water and add a small amount of sanitizer, such as Star San or Oxy-San. Soak all the instruments in this mixture for a few minutes, then drain and leave to dry. There’s no need to rinse!
For more information, see our guide: How to Clean and Sanitize your Fermentation Equipment.
2. Preparing the Wort
The wort is a mixture of apple juice and other ingredients that will be transformed into alcohol. We recommend using unfiltered, preservative-free apple juice.
Although some enthusiasts prefer 100% natural apple juice, we suggest adding a teaspoon of yeast nutrients to help ensure a healthy, vigorous fermentation.
Rehydrate the yeast in a small bowl of warm water before adding it to the juice to avoid thermal shock. Then aerate the wort vigorously while stirring, as yeast requires oxygen during the early stages of fermentation.
3. Letting It Ferment
The first few days of hard cider fermentation are very active. Yeast reproduces quickly and creates a lot of CO2. It’s important to store the carboy in a place where the temperature is stable, ideally between 15 and 20 degrees Celsius.
During fermentation, the juice thins out and sediments accumulate at the bottom. These sediments are called lees. They can be separated from the hard cider by pouring the cider into a new carboy to clarify it.
Fermentation times vary, but a good rule of thumb is to wait until there are no more bubbles in the airlock and the density of the mixture is below 1.005.
4. Bottling
Carefully transfer the cider into pressure resistant bottles. If you want a sparkling hard cider, add about a teaspoon of sugar per bottle before sealing.
You can enjoy your cider straight away but leaving it to age for a few months will allow the flavours to develop further.

Homemade Hard Apple Cider Recipe
Equipment
- 1 pierced stopper
- 1 Funnel
- 1 hydrometer (optional)
- 1 graduated test tube (optional)
- Star San Sanitizer or Oxy-San
Ingredients
- 3,8 L apple juice without additives
- 1 sachet D47 Yeast
- ½ tsp. yeast nutrients
- Sugar, for bottling optional
Steps
Equipment Sanitation
- Gather all the equipment that will be used.
- Add 1 tbsp. (15 g) of sanitizer to the carboy.
- Fill the carboy to the brim with cold water and leave to work for at least 2 minutes.
- Clean your sink, close the lid, and pour the contents of the carboy into the sink.
- Soak the equipment in the sink for at least 2 minutes.
- Remove the equipment and allow it to drain without rinsing.
Preparing the Wort
- Pour the contents of the yeast sachet into a glass of warm water to rehydrate. Leave for 15 minutes.
- Place the funnel on the carboy and pour in the rehydrated yeast followed by the apple juice.
- Screw the cap on the carboy and shake vigorously to oxygenate the wort (this encourages yeast growth).
- (Optional) Use a hydrometer to measure the initial density of the wort and record the value.
Fermentation
- Insert the flexible tube into the rubber stopper, then fit the stopper onto the carboy.
- Add ½ teaspoon of sanitizer to a large glass of water and place the end of the tube in this glass (to let the CO2 out without letting air in). This technique is more effective than an airlock and avoids the risk of overflows.
- After 4-5 days, when fermentation is less vigorous, remove the tube and install the water-filled airlock in its place.
- Let it ferment for at least two weeks at room temperature, without disturbing the carboy.
Bottling
- Make sure that the cider has finished fermenting: there should be no bubbles in the airlock and the density of the mixture should be less than 1.005 (measured with a hydrometer).
- Sanitize the bottles, auto siphon, and funnel.
- Use the auto siphon to transfer the cider into the bottles, taking care not to disturb the lees at the bottom of the carboy.
- (Optional) Add approximately 8-10g of sugar to each 750 ml bottle for sparkling hard cider.
- Close the bottles and store them at room temperature.
Notes
When and How to Rack the Hard Cider?
Racking is a crucial step in the cider-making process. It improves clarity, flavour, and stability and reduces the risk of contamination. It involves separating the hard cider from the lees (yeast sediment) that settle at the bottom of the carboy.
When to Rack?
It is recommended to do the first racking after primary fermentation, which generally lasts between 2 and 4 weeks. This ensures that most of the fermentation has taken place and that the cider has had time to develop complex aromas and flavours. However, if you are looking for a specific flavour profile or following a particular recipe, racking times may vary. Be careful not to rack too early, as this can have an impact on flavour development and fermentation progress.
How to Rack?
- Make sure the auto siphon and the new carboy are thoroughly cleaned and sanitized.
- Use the auto siphon to transfer the hard cider into the new carboy, taking care not to disturb the layer of sediment.
- If necessary, top up with previously fermented hard cider or water to within about 5 cm of the neck.
- Install an airlock on the new carboy.
How Many Rackings?
You can do just one racking, directly into the bottles. However, it is also possible to do several rackings during fermentation for optimum clarity.
When Is the Hard Cider Ready to Be Bottled?
Your cider is ready to be bottled when:
- The cider has been fermenting for at least two weeks
- The cider has lost its sweet taste
- The density of the cider is below 1.005
- No more bubbles are forming in the airlock
If any of these criteria are not met, leave the hard cider to ferment for at least two more weeks.
If you bottle the hard cider too soon, some sugar will remain in the wort and excessive bubbles will be created. Your bottles could struggle to cope with all that pressure!

How To Measure the Alcohol Content of Hard Cider?
The alcohol content of cider can be calculated using a tool called a hydrometer. This tool measures the density of a liquid, which can help us determine how much sugar has been converted into alcohol by yeast during fermentation.
Here’s how it works: By placing the hydrometer in the cider, you can see how deep it sinks. The sweeter the cider, the more the hydrometer floats to the surface. By taking a density measurement before fermentation and another afterwards, you can compare the two values. The difference between these two measurements tells us how much sugar has been converted into alcohol.
In Summary:
- The higher the initial density, the more sugar the cider contains.
- The greater the difference between the initial and final density, the more alcohol the cider contains.
How to Measure Hard Cider Density
Density should be measured before and after fermentation, to determine the difference between the two values.
How density is measured:
- Sanitize the hydrometer and the test tube.
- Fill the test tube with the liquid to be measured (juice or cider).
- Immerse the hydrometer in the liquid.
- Rotate it gently to eliminate any bubbles.
- Make sure it floats freely without touching the rims.
- Read the measurement at the surface of the liquid and record the value and date.
- If the equipment has been correctly handled and disinfected, return the sample to the carboy.
A measurement of the density of the juice (before fermentation) and a measurement of the density of the hard cider (after fermentation) should be taken. By calculating the difference, you can work out the alcohol content.
How to Calculate the Alcohol Content of Hard Cider
From the initial density (of the juice) and the final density (of the hard cider), you can calculate the alcohol content using the following formula: Alcohol (%) = (Initial density – Final density) X 131.25
So, if your initial density was 1,050 and your final density was 1,000, your hard cider would contain around 6.5% alcohol.

How Do You Make Sweet Hard Cider?
Our cider recipe produces a dry hard cider, i.e., with no residual sugar.
During fermentation, yeast will always consume all available sugar. If the cider is bottled before the yeast has consumed all the sugar, it will continue to ferment in the bottle and could lead to explosions.
There are several options for hard cider with residual sugar:
- Kill the yeast by adding sulphites so that they don’t consume all the available sugar.
- Add sugar that yeast cannot consume during bottling (e.g., erythritol, stevia, etc.).
- Add enough sugar to reach the maximum alcohol content your yeast can tolerate. Any additional sugar will not be converted into alcohol or CO2.
Frequently Asked Questions About Hard Cider
How Can I Tell if Fermentation Is Going Well?
To find out if fermentation is proceeding correctly when making homemade apple cider, look for regular bubbles in the bubbler, the presence of foam on the surface of the wort, and the decrease in density measured with a hydrometer and detect a pleasant fruity fermentation odour.
How Should Homemade Hard Cider Be Stored to Preserve Its Quality and Flavour?
We recommend storing it in pressure resistant glass bottles, tightly closed with hermetic stoppers. It’s best to keep the bottles in a cool, dark place, at a constant temperature, to avoid variations that could alter the taste of the cider. It is also important to limit exposure to oxygen by filling the bottles to within a few centimetres of the neck and avoiding frequent transfers. Homemade hard cider can improve over time, so an ageing period of a few months can enhance its characteristics.
What Are the Common Mistakes to Avoid When Making Homemade Apple Hard Cider?
Here’s a summary of common mistakes to avoid when making homemade hard cider:
- Poor hygiene
- Using apple juice with additives
- Too much sugar
- Wrong choice of yeast
- Inappropriate fermentation temperature
- Premature bottling
By avoiding these mistakes, you maximize your chances of producing quality hard cider.
What Is the Best Temperature for Fermenting Hard Cider?
The ideal fermentation temperature for hard cider is generally between 13°C and 22°C (55°F and 72°F). A lower temperature can produce a cleaner, more refined cider, while a higher temperature promotes fruity, full-bodied flavours. It’s important to choose the right temperature for the strain of yeast you’re using and to monitor the temperature to avoid excessive fluctuations.
Why Has a White Film Formed on the Surface?
The formation of a white film on the surface of cider may be due to the presence of wild yeast or undesirable bacteria. This film is often the result of excessive exposure to oxygen or contamination during the cider fermentation process. It may be possible to correct the situation by transferring the hard cider to a new, sanitized tank. Adding fresh yeast and installing an airlock will help prevent future contamination.
Why Is My Hard Cider Still Sweet After Several Weeks of Fermentation?
If your hard cider is still sweet after several weeks of fermentation, this may indicate incomplete fermentation, inadequate fermentation conditions, or the use of ineffective yeast.
To unblock the fermentation, you have several options:
- Rack the wort into a new carboy
- Add yeast nutrient
- Add a new yeast source
- Stir vigorously for a few minutes
Do not bottle a stalled cider. The yeast could wake up and continue fermentation in the bottles. BOOM! 💥
Why Is My Hard Cider Acidic?
If your hard cider tastes like vinegar, you’ve met the #1 enemy of all alcohol producers: acetic acid bacteria! These bacteria consume the alcohol to transform it into vinegar.
Contamination can be caused by exposure to air, the use of unsanitized equipment, or contact with fruit flies.
Unfortunately, there’s no going back once your cider is contaminated. You can, however, transfer the cider to a wide mouth jar, cover it with a breathable cloth, and turn it into cider vinegar!
Why Is My Hard Cider Thick and Sticky?
If your cider is thick and sticky, it may be due to bacterial contamination by “ropy” bacteria. To remedy this problem, add sulphites, aerate vigorously, and leave to stand away from oxygen. If the problem persists, it’s best to discard the cider. Make sure you maintain strict hygiene when making cider to avoid bacterial contamination.
Why Does My Hard Cider Taste Like a Hamster Cage?
If your cider has an unpleasant smell or taste, this may indicate bacterial contamination or altered fermentation. We recommend that you discard the affected cider and ensure that all the equipment used is thoroughly sanitized to prevent future contamination. Maintaining strict hygiene throughout the cider-making process is essential to prevent unwanted taste problems.

